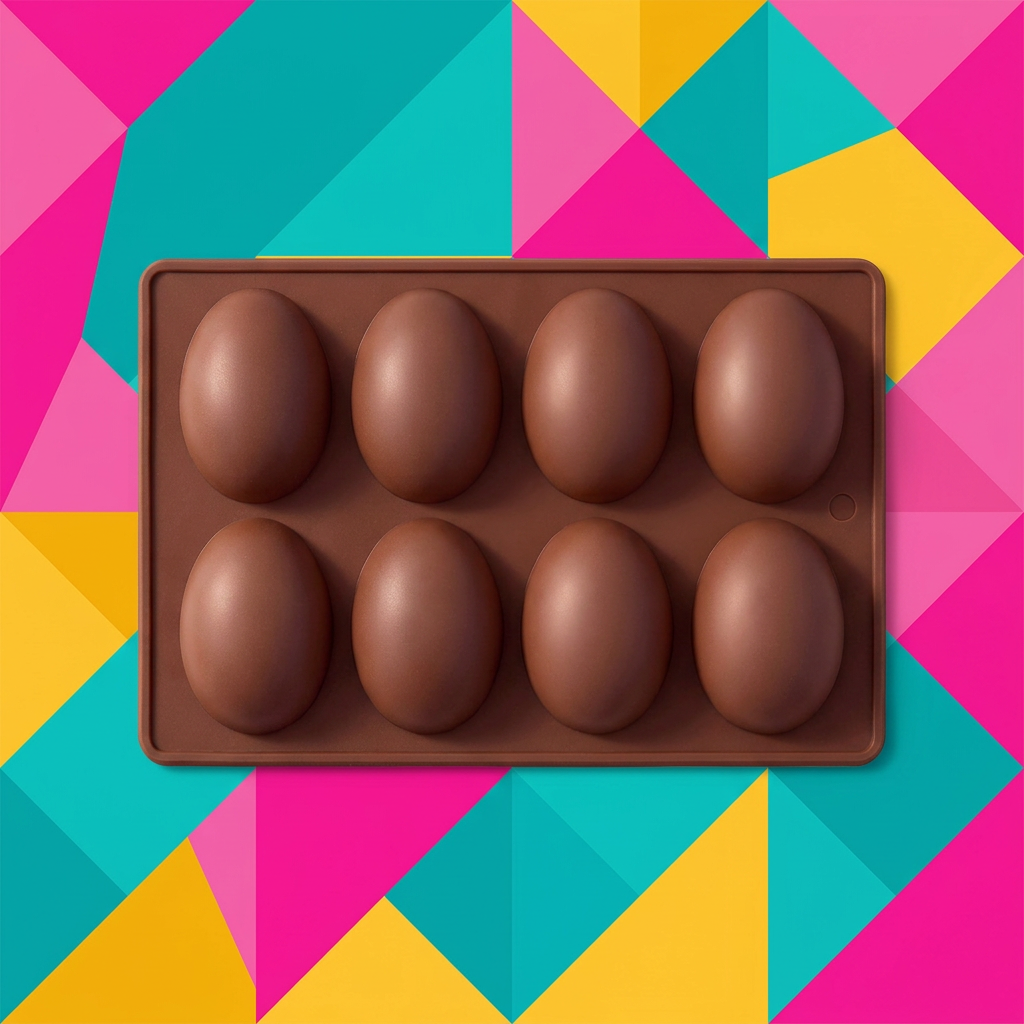
Brown 8-Position Egg-Shaped Dessert Mold with Two-Row Layout & Smooth Oval Profiles for Creative Seasonal Treat Presentations
Brown 8-Position Egg-Shaped Dessert Mold with Two-Row Layout & Smooth Oval Profiles for Creative Seasonal Treat Presentations
Couldn't load pickup availability

Brown 8-Position Egg-Shaped Dessert Mold with Two-Row Layout & Smooth Oval Profiles for Creative Seasonal Treat Presentations
🥚 Eight Little Shapes. A Whole Table of Possibilities.
A memorable dessert does not always begin with an elaborate decoration. Sometimes it starts with a recognizable outline: a rounded base, a softly tapered end, and a shape that immediately suggests spring celebrations and playful table settings.
This brown egg-shaped dessert mold brings that outline into a rectangular format, with eight positions arranged in two rows of four. The reference shows its reverse face, where the smooth egg-half profiles rise above the surrounding border. It is a simple, repeated design that gives a creative project a clear visual starting point.
Choose a recipe and method approved for the actual product, then build the presentation around the shape. From restrained color accents to more expressive seasonal decoration, the egg outline gives you something distinctive to work with before you reach for the finishing tools.
🎨 Begin with a Creative Brief, Not a Complicated Finish
Imagine the table you want to create. Is it a pastel spring gathering with soft blue plates and pale yellow details? A chocolate-colored dessert display with a single contrasting drizzle? Or a bright celebration with each piece decorated differently?
Starting with a clear palette makes the rest of the project easier to plan. Choose two or three colors, decide how much decoration each piece needs, and leave some room for the shape itself to remain visible. An egg silhouette can be recognizable without a heavy layer of embellishment.
These are presentation ideas rather than a guarantee that every mixture or cooking method is compatible with the mold. Confirm the product's permitted uses, food-contact information, and temperature limits before selecting your recipe.
🔢 The Layout: Two Rows, Four Forms, One Connected Frame
A repeated design you can plan around
The eight visible forms follow the same general egg profile, arranged neatly across two rows. That repetition offers a useful visual structure when planning a themed display. You might keep every finished piece alike or divide your decorating plan into small groups.
A rectangular outline around the shapes
A shallow border connects the egg forms within a single rectangular outline. The corners are rounded rather than sharply squared, and there is visible spacing between the individual profiles. The reference does not supply the mold's dimensions, cavity volume, or finished portion size.
An important distinction: egg halves, not a sealed full-egg system
The visible forms have rounded egg-half profiles. The image does not show a second matching mold, a closure, or an alignment system for making complete three-dimensional eggs. Do not assume that two halves will join seamlessly or that a lid is included.
🍫 Three Styling Directions to Make the Shape Your Own
The dark-and-light contrast
For a recipe confirmed suitable for the mold, consider a finished dessert with a deep brown appearance and a light finishing accent. A narrow decorative line or a small contrasting detail can make the curved outline stand out without covering it. Choose ingredients and handling methods appropriate to your recipe.
The spring color story
Soft pink, pale green, lavender, and yellow create a seasonal palette around the egg shape. You do not need every color on every piece. One color per group can make a platter feel coordinated while still giving it variety.
The minimal finish
Let the silhouette carry the presentation. Place the finished pieces on a contrasting serving dish and keep the surrounding decoration restrained. A simple arrangement can make the repetition of the egg shapes feel intentional rather than busy.
Chocolate, cakes, decorations, piping bags, plates, and other props in styled images are not supplied with the mold. They illustrate possible presentation directions, not included ingredients or a tested recipe.
📝 Your Project Plan, from Idea to Serving Plate
- Confirm the method. Read the product instructions for permitted food uses and temperature conditions. The reference's baking imagery is not a substitute for verified heat limits.
- Choose a compatible recipe. Check that its preparation, cooking or setting requirements fit the mold's confirmed specifications.
- Plan your quantity. Use the actual cavity capacity and recipe guidance to calculate amounts. Eight visible positions do not establish a specific batter weight or serving size.
- Prepare the workspace. Follow the instructions for cleaning, supporting, filling, and moving the mold. Do not improvise a support method from the photograph.
- Allow the required finish time. Follow the recipe and mold directions before attempting removal. A shape can be delicate even after its surface appears ready.
- Decorate and arrange. Work with finished pieces that are ready for the chosen decoration, then transfer them to suitable serving dishes.
🎂 A Weekend Project with Room for Your Own Style
You clear the counter and choose a small color palette for a seasonal dessert table. The recipe comes first, along with a check of the mold's approved uses. Once the method is confirmed, you gather the ingredients and decide which finishing details will make the egg shapes stand out.
Instead of decorating every piece differently, you sketch a simple pattern: one group with a contrasting line, another with a small finishing accent, and a few left understated. The repeated shape keeps the display connected even when the decorations vary.
By serving time, the table has a recognizable theme without needing a large centerpiece. The pleasure is in the decisions you made along the way: a clear shape, a coherent palette, and enough variation to make the project feel personal.
📐 Look Closely at the Profile
Each visible egg form has a broad rounded end that narrows toward the opposite tip. The surface appears smooth, with no embossed pattern or decorative texture shown in the reference. That leaves the visual emphasis on the outline rather than on a built-in motif.
The brown color helps the curved forms stand out under directional light. A highlight across the dome makes the rise of each profile visible, while the surrounding border stays comparatively flat. This is useful when examining the product's shape, but it does not establish a coating or nonstick performance.
Because the reference shows the raised reverse side, it does not fully reveal the interior finish. No exact depth, wall thickness, flexibility rating, or release mechanism is specified here.
🎁 Think beyond a Single Occasion
A coordinated seasonal table
The egg shape naturally complements spring-themed settings. Pair the finished treats with a small number of coordinated colors rather than surrounding them with every seasonal decoration at once.
A dessert platter with variation
A repeated outline can bring different finishes together. Keep the serving dish simple, leave space between pieces, and let the decorative accents distinguish one group from another.
A thoughtfully presented edible gift
If your verified recipe is appropriate for gifting, choose packaging that protects the finished shape and meets the food's storage needs. Gift boxes, liners, and wrapping are separate accessories, not part of this product.
The mold provides a design direction, not a storage-life guarantee for the food you make. Follow the recipe's food-safety and storage guidance throughout preparation and presentation.
🧽 Care That Keeps the Next Project in Mind
Before first use, follow the supplied cleaning instructions. The image does not confirm dishwasher compatibility, an approved detergent, or a maximum cleaning temperature. Do not assume that a brown mold must be silicone or that it can be treated like a metal baking pan.
After use, check the areas around the egg forms and the outer border for residue. Use the manufacturer's recommended cleaning method and avoid sharp tools or abrasive treatment unless explicitly permitted.
Allow the mold to dry as directed before storage. Keep it away from items that could cut, distort, or damage its surface, and inspect it before the next food project. If the material or condition raises concerns, confirm suitability before using it again.
🔎 Know the Product before You Choose the Recipe
- Visible format: One brown rectangular mold with eight egg-shaped positions.
- Arrangement: Two rows of four forms.
- Profile: Smooth rounded egg-half shapes shown from the reverse side.
- Outer details: Shallow connecting border and rounded corners.
- Not shown as included: A lid, a second joining mold, baking sheet, serving plate, decorating tools, or ingredients.
- Specifications to confirm: Material, food-contact suitability, dimensions, cavity capacity, temperature limits, and care instructions.
🕯️ A Few Expectations Worth Keeping Clear
The reference does not verify oven, microwave, freezer, or dishwasher compatibility. It also does not establish BPA-free status, a food-safety certification, easy-release performance, or a guaranteed number of reuse cycles. Those claims require actual product specifications.
No cooking temperature, baking duration, fill level, or demolding technique is invented here. The right approach depends on both the mold and the recipe. Checking those details first gives your creative plan a much stronger foundation.
The visible design is still distinctive: eight smooth egg-half profiles in a brown rectangular frame. If that is the shape you want for your next project, it offers a clear starting point for selecting an approved method and planning the presentation.
🎊 Start with the Shape. Finish with Something Personal.
A themed dessert does not need to look like everyone else's. Keep the egg outline, choose a palette that suits your table, and decide where a small decorative detail will have the most impact.
Consider this eight-position egg-shaped mold for your next creative dessert project. Confirm the product specifications, choose a compatible recipe, and bring your own finishing ideas to a shape that is instantly recognizable.